Have you always wanted to learn to hand quilt?? Well, what is stopping you?
Starting is as simple as picking up some fabric, batting, needle, and thread.
STOP making it a big deal and
START quilting!!
Just DO IT!!! And HAVE FUN!!!
So many of us are perfectionists and that leads to paralysis. We tend to wait for that "special quilt" before starting to hand quilt and when we have the special one we are afraid of ruining it ... Any of this sound familiar?
The best remedy is just to
START stitching.
Here are the very simple basics:
- 15-inch piece of fun fabric for the top,
- 15-inch piece of batting (I recommend a thin wool or silk batt), and
- 15-inch piece of fabric for the back.
- Cotton thread
- Quilting needle
- Thimble
Grab a chalk pencil to draw a simple grid or geometric design. Use a white lead for dark fabric or the pencil chalk for light colored top. Or try quilting along the lines of a large plaid or a floral or holiday pattern - no marking needed.
Layer starting with backing wrong side facing up, batting, top fabric right side facing up. Hand baste (simple running stitch through all 3 layers) or pin to secure. And don't forget a thimble to protect your finger. Think of this as a test and don't put pressure on yourself. It is only a little bit of fabric. Get comfortable with the process on this sample instead of your great masterpiece. If you like it make it into a pillow, if not, save it to look back on in a few years and see your progress.
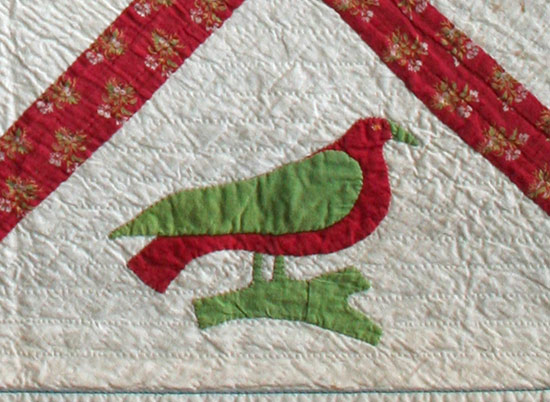
 |
| Detail - Virginia Is For Lovers - Sandra Starley |
Just Try It!!
Thread a quilting needle with a cotton thread - it doesn't have to be special quilting thread or a super teeny needle. You will need to tie a small double knot at the end of the thread and pull it through into the batting. Use your needle to pull the thread end out of sight. There are two basic stitches: rocking stitch or stab stitch. Try both and see which you like. Try different battings - see which suits YOU best. Same with needles and thread. Find your bliss!!
HAVE FUN!!!
Hand quilt where it will show - block centers, borders. Feel free to machine quilt in the ditch, in seams, etc. Showcase the hand quilting. As you grow in confidence start using fun, bright threads and bolder designs/patterns.
 |
| Detail Pennsylvania Posies - Sandra Starley |
------------------------------------------------------------------------------------------------------------------
Keep on Learning - visit the rest of the blog hop stops to learn something new everyday this month!
Here’s the blog hop team and their topics:
Day 3 – September 3 – Angie Wilson – Fussy cutting tips and techniques –
www.gnomeangel.com
Day 5 – September 5 – Bobbie Gentili – Say YES to Y-seams –
geekybobbin.com
Day 8 – September 8 – Suzy Webster – How to solve loops in free motion quilting –
www.websterquilt.com
Day 9 – September 9 – Tara Miller – Accurate Stitch-and-Flip Corners –
quiltdistrict.com
Day 11 – September 11 – Sarah Ruiz – The Magic of Glue Basting –
saroy.net
Day 13 – September 13 – Cheryl Sleboda – Basics of ruching (a vintage fabric manipulation technique) –
muppin.com
Day 15 – September 15 – Jen Strauser – Accurate and Attractive Machine binding –
dizzyquilter.com
Day 16 – September 16 – Jane Davidson – Matching points for all types of intersections –
quiltjane.com
Day 17 – September 17 – Teresa Coates – Starch and starch alternatives –
teresacoates.com
Day 21 – September 21 – Kris Driessen – All Kinds of Square (in a Square) –
scrapdash.com
Day 24 – September 24 – Cheryl Daines Brown – The Secret to Flat Quilt Tops: Borders –
quilterchic.com
Day 27 – September 27 – Ebony Love – Cutting Bias Strips from a Rectangle –
lovebugstudios.com
Day 28 – September 28 – Tammy Silvers – Working with heavier weight threads in your machine –
tamarinis.typepad.com
Day 29 – September 29 – Kathy Nutley – Create a perfect facing or frame with 90 degree angles –
quiltingsbykathy.com