Tuesday, February 14, 2023

Island Batik All Puffed Up Puff Quilt Blog Hop

This month's challenge for Island Batik Ambassadors is making a puff or biscuit or pillow (poofy) quilt. I've never made one before and it was an interesting challenge. More about that in a minute.


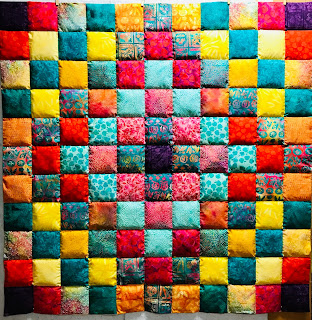
Rainbow Trip Around the Garden
55" x  55"
Traditional and Original Design
Sandra Starley
February 2023

Fabrics: Garden Delight Collection - every fabric (20 pieces)
Backing: Island Batik Linen  (Naturally Neutrals)
Batting: Hobbs Poly-Down Batting and 
Piecing Thread: Aurifil #50 weight
Quilting Thread: Aurifil #50 weight
80/12 Microtex Needle: Schmetz Quilting Needles 
Pieced and quilted by Sandra Starley 

***Fabrics provided by Island Batik, batting by Hobbs, thread by Aurifil, needles by Schmetz, Strip cutter and Go Cutting Machine by Accuquilt,  

Ollie the Owl enjoying the cozy puff quilt on a snowy morning.

A bit of the design process. I played a bit with the colors and decided the technique and fabrics were perfect for a traditional Trip Around the World. I do love using antique patterns.

I viewed a LOT of videos and tutorials on how to make a puff quilt but did not want to do the method shown most with lots of pieces and tedious sewing. Cutting over a 100 top pieces and 100 plus backing pieces and 300 batting pieces?? No!

And I didn't want to try to tie or quilt a super poofy quilt. 

I found an easier version that did not require making individual puffs or cutting squares of backing and sewing them together. YAY!!! 

I simply cut all the 5 1/2" strips and then squares using my Accuquilt cutter and sewed them together in the regular way. Next I placed the completed top on the backing (without batting).  I then sewed one horizontal line (between rows 5/6) all the way across the top. 

Next step is sewing all the long/vertical seams creating half channels. This means I only needed to reach inside 1/2 of the quilt for stuffing. These were then stuffed with Poly-down polyester barting from Hobbs. I worked in rows - starting with the rows created by my horizontal seam (row 5 and 6). Once they were stuffed, I closed them with another horizontal seam. I kept repeating until all the rows/squares were puffed! 

I loved that I did not need to make each little puff unit. But could I make the process even easier? Yes, I found a trick of creating 3 layers of  batting by strip cutting the batting and folding them into thirds to stuff each puff. So instead of cutting 363 squares, I only cut 121 strips. *I cut the batting in 4 1/2" strips across the width and then subcut to 13 1/2" strips. This meant I got three layers of puffing with a single strip of batting. It does take a lot of batting and I used almost an entire queen sized batting to create this quilt! Thanks again Hobbs Batting!

I used a facing/knife edge binding technique to finish the edges. Always good to experiment and try new things!

Things I learned - 1) puff quilts are kind of fun, 2) don't make your squares any smaller than 5 1/2 cut/ 5" finished or you won't be able to get your arm inside the stuffing channels, 3) a walking foot is a must have for sewing/quilting your puffy rows, and 4) remember to experiment and have FUN!!

Visit the Island Batik Blog each week this month for great giveaways and check out all the other Island Batik Ambassadors and their Puff Quilts.

****The following shops have the Garden Delight Collection now!!! ***
Creekside Quilts OREE Schenck Co ORHancocks of Paducah KYSwifty Stitches CA

Monday, February 13, 2023

Chickadee Churn Dash - Chickadee Blog Hop


 Hi - Look at this fun block with fabulous fabrics.


Welcome to my stop on the Chickadee Blog Hop introducing the new Island Batik collection designed by Kathy Engle for Heidi Pridemore of Whimsical Workshop. Don't forget to scroll down to the end of this post for links to visit the other stops and get the patterns on the blog hop.


 I love Heidi's collection of fun chicken patterns and patchwork hearts. Plus great dots and other cheery textures including chicken wire.  I was able to use each of the 20 fabrics from the the group for my block.

I really like to recreate pieces of the past and am often inspired by antique quilts in my collection when working on challenges and new patterns. Churn Dash or Shoofly or Monkeywrench is an awesome traditional pattern. I doubled the pattern or added a Dash center for a more modern block. 

Step by Step Pattern for the 12 inch finished (12 1/2" unfinished) Double Dash block using simple pieces and easy half-square triangles.

         CUTTING 
Part I - Churn Dash A - 6 1/2" (6" finished)

#1 - Center square -cut 1 dark - 2 1/2" square

#2  Side strips background dot and dark floral 
 Cut 
4 light rectangles - 1 1/2" x 2 1/2" 
4 dark rectangles - 1 1/2" x 2 1/2"
 

#3 Half Square Triangle Corners - dot and dark floral
Cut 2 sets -used for 4 corners -diagonal seam 1/2 square triangles - see below
   2 light squares
 - 3"  
   2 dark squares - 3"  
**after sewing trim down to 2 1/2" squares 

Part II -  Churn Dash B - 12 1/2" (12" finished)

(Center is completed Churn Dash A) 

#1 Side strips background dots/florals and - dark floral 
 Cut
4 light rectangles - 2" x 6 1/2" 
4 dark rectangles - 2" x 6 1/2"

#2 Half Square Triangle Corners - lt. dot/floral and dark floral
Cut 2 sets  -
used for 4 corners -diagonal seam 1/2 square triangles
2 light squares - 4"  
2 dark squares - 4"
**after sewing trim down to 3 1/2" squares

        PIECING 
#1 - Diagonal seams - Half square triangles using 2 sets of light and dark squares (background and florals fabrics) for corners of each Churn Dash sections. You'll make 2 different sets - small for Churn A and larger for Churn B.

Place a background and floral 3" square right sides together and draw a diagonal line from corner to corner on back of light fabric. Then draw a sewing line 1/4" on both sides of the diagonal. 
You will sew on these lines. Cut on the middle line and press block to the dark. Make 2nd pair of half squares. This makes 4 half square triangles. **Trim Churn A units to 2 1/2". 

Repeat process with 4" squares for Churn Dash B corners and make another 4 half square triangles. **Trim these to 3 1/2".

#2  Rectangle Strip units -
Sew a  light and dark rectangle (1 1/2" x 2 1/2")  together, press to dark, repeat to make 4 units for Churn A.

Sew a  light and dark rectangle (2" x 6 1/2")  together, press to dark, repeat to make 4 units for Churn B.

#3 - Block Construction  **for nesting seams and no dark fabric shadows, I pieced in horizontal rows and pressed to the dark fabrics and toward the rectangle strip sets.

Churn A - 
Row 1 and 3 - join 2 smaller 1/2 square triangles to a smaller rectangle strip,
Row 2 - join 2 rectangle strips to center square  
Add rows 1 and 3 to top/bottom of center row.
Churn A block should measure 6 1/2" 

Churn B
Row 1 and 3 - join 2 larger 1/2 square triangles to a larger rectangle strip,
Row 2 - join 2 rectangle strips to sides of Churn A
Add rows 1 and 3 to top/bottom of center row.
Double Churn Block should measure 12 1/2"

Voila!! 

Here are the links to see more wonderful projects featuring the Chickadee Collection:

Heidi Pridemore (this is her amazing fabric collection!) Heidi's blog
Leanne Parsons Devoted Quilter
Tammy Silvers Tamarinis
Nancy Scott MasterpieceQuilting
Katie Mae Quilts  KatieMaeQuilts
Rebecca Lidstrom StudiorQuilts
Tiffany Hayes  Needle In A Hayes Stack
Laura Piland Slice of Pi Quilts

Kris Driessen Scrap Dash


Related Posts Plugin for WordPress, Blogger...