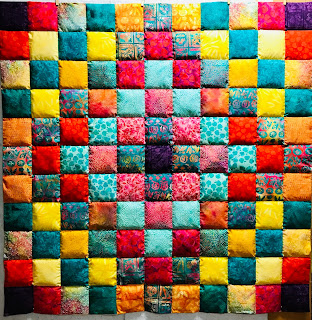
A bit of the design process. I played a bit with the colors and decided the technique and fabrics were perfect for a traditional Trip Around the World. I do love using antique patterns.
I viewed a LOT of videos and tutorials on how to make a puff quilt but did not want to do the method shown most with lots of pieces and tedious sewing. Cutting over a 100 top pieces and 100 plus backing pieces and 300 batting pieces?? No!
And I didn't want to try to tie or quilt a super poofy quilt.
I found an easier version that did not require making individual puffs or cutting squares of backing and sewing them together. YAY!!!
I simply cut all the 5 1/2" strips and then squares using my Accuquilt cutter and sewed them together in the regular way. Next I placed the completed top on the backing (without batting). I then sewed one horizontal line (between rows 5/6) all the way across the top.
Next step is sewing all the long/vertical seams creating half channels. This means I only needed to reach inside 1/2 of the quilt for stuffing. These were then stuffed with Poly-down polyester barting from Hobbs. I worked in rows - starting with the rows created by my horizontal seam (row 5 and 6). Once they were stuffed, I closed them with another horizontal seam. I kept repeating until all the rows/squares were puffed!
I loved that I did not need to make each little puff unit. But could I make the process even easier? Yes, I found a trick of creating 3 layers of batting by strip cutting the batting and folding them into thirds to stuff each puff. So instead of cutting 363 squares, I only cut 121 strips. *I cut the batting in 4 1/2" strips across the width and then subcut to 13 1/2" strips. This meant I got three layers of puffing with a single strip of batting. It does take a lot of batting and I used almost an entire queen sized batting to create this quilt! Thanks again Hobbs Batting!
I used a facing/knife edge binding technique to finish the edges. Always good to experiment and try new things!
Things I learned - 1) puff quilts are kind of fun, 2) don't make your squares any smaller than 5 1/2 cut/ 5" finished or you won't be able to get your arm inside the stuffing channels, 3) a walking foot is a must have for sewing/quilting your puffy rows, and 4) remember to experiment and have FUN!!
Visit the Island Batik Blog each week this month for great giveaways and check out all the other Island Batik Ambassadors and their Puff Quilts.
****The following shops have the Garden Delight Collection now!!! ***
Creekside Quilts OREE Schenck Co ORHancocks of Paducah KYSwifty Stitches CA


.jpg)


Beautiful quilt! I love the bright colors in this collection.
ReplyDeleteThat sounds like an interesting approach. It has been fun to see how many different ways there are to make a puff quilt. I like your TATW setting. I considered doing that too, but I ended up going with a random fabric placement. Have a great day!
ReplyDeleteLooks like a nice cozy quilt.
ReplyDeleteIt's beautiful, Sandra! Really love the layout!
ReplyDeletethanks for sharing. your quilt is lovely. thanks for the tips. I havent made one yet but would love to give it a try
ReplyDeleteWow I so like this fabric collection ty for sharing your thoughts...
ReplyDeleteVery pretty!
ReplyDeleteBeautiful
ReplyDeleteI like these color's. So many different ways to make the quilt's puffy, yours sounds like the easiest yet, might just have to try one this year.
ReplyDeleteVery vibrant and pretty.
ReplyDelete