Showing posts with label Island Batik. Show all posts

Monday, November 21, 2022

November 2022 - Creative Christmas Stocking Challenge with Island Batik Ambassadors

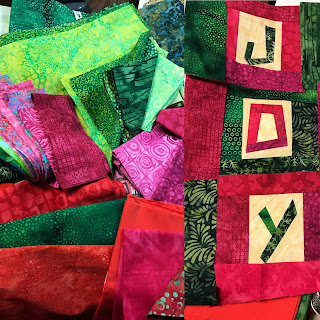
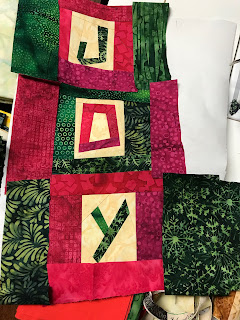
 I love spreading JOY and sew I decided to make a stocking full of JOY for this month's Island Batik Ambassador Challenge - Creative Christmas Stockings. I haven't made a stocking in a long time so it was fun to stretch my creative muscles on this project.


I used my paper piecing alphabet blocks from my Love and Joy Word Play Quilt but changed up the colors and used more neutrals to frame and showcase the letters. I then added contrasting log cabin strips to each blocks. A few more strips on the block sides and the toe end of the stocking and the top was done. It was fun to use wintry greens with brighter rich pink fabrics instead of traditional red pairing.


I drew a rough sketch of a stocking on freezer paper and used it as a template for my design and played with color/fabric placement. I then refined the stocking shape to pleasing proportions of approximately 8 inches wide and 19 inches long. This improvisational piecing can lead to some make do challenges but I like the freeform piecing freedom. You can also simply adjust the stocking size to your piecework. Many different ways to make it work! 


Once I had the front done. I added Hobbs Premium  Bleached Cotton Batting and quilted with pink Aurifil thread (50 weight). 

STOCKING TUTORIAL:
Piece and quilt your stocking front. 
Trim to your chosen size. 
Use front as template to cut backing and 2 lining pieces. 
Join the front and backing, right sides together with hanger inside. 
Start at top edge of one side edge and sew around to the other side. 
Do NOT sew across the top edge. 
Join the 2 lining pieces in the same way.

*Hanging strip. 
2" x 6 1/2" folded in half twice and sewn closed along length.
Place inside, between the front and the back before sewing them together.
Make sure it is inside -not outside like in my photo or you'll end up resewing ;)


Turn the stocking (front and back) right sides out and press flat. 
Place stocking inside the lining (lining still right sides together). 
Pin the 2 units together along the top edge. 
Sew stocking and lining together. 
Start at one side of the backing, sew around the front, and to the back side. 
Leave 3" to 4" UNSEWN along top of backing to turn the stocking. 
Pull the stocking through the unsewn top edge. 
Tuck the lining inside. 
Fold the unsewn lining and backing edges together and top-stitch closed. 

Voila - a beautiful stocking for your mantle.


 STOCKING DETAILS: 

Christmas Joy!
8" x 19"
Original Design
Sandra Starley 2022

Foundation paper pieced blocks -fabrics by Island Batik
Lining:  IB Bubble Hole (Basics)
Piecing Thread: Aurifil #50 weight
Quilting Thread: Aurifil #50 weight
                             Pieced and quilted by Sandra Starley 

***Fabrics provided by Island Batik, batting by Hobbs, thread by Aurifil, and needles by Schmetz and pressing mat by Prairie Spirit Alpacas. ***


To see more Creative Stockings , visit my fellow 2022 Island Batik Brand Ambassadors:

Brenda Alburl ~ Songbird Designs
Megan Best ~ Bestquilter
Pamela Boatright ~ Pamelaquilts
Elizabeth DeCroos ~ Epida Studio
Jennifer Fulton ~ Inquiring Quilter

Preeti Harris ~ Sew Preeti Quilts
Mania Hatziioannidi ~ Mania for quilts
Jane Hauprich ~ Stitch By Stitch Custom Quilting
Reed Johnson ~ Blue Bear Quilts
Connie Kauffman ~ Kauffman Designs

Emily Leachman ~ The Darling Dogwood
Denise Looney ~ For The Love Of Geese
Leah Malasky ~ Quilted Delights
Maryellen McAuliffe ~ Mary Mack Made Mine
Anorina Morris – sameliasmum.com

Lisa Pickering ~ Lisa’s Quilting Passion
Claudia Porter ~ Create with Claudia
Gail Renna ~ Quilt Haven Threads
Brianna Roberts ~ Sew Cute And Quirky
Michelle Roberts ~ Creative Blonde

Gail Sheppard ~ Quilting Gail
Andi Stanfield ~ True Blue Quilts
Jennifer Thomas ~ Curlicue Creations
Suzy Webster ~ Websterquilt


Sunday, October 30, 2022

October 2022 "It's In The Bag" Challenge with Patterns By Annie and Island Batik

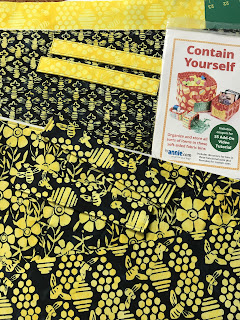
 This month's challenge with Island Batik's Brand Ambassador Program is a partnership with fellow Utahn Annie Unrein of ByAnnie.com. I picked the Contain Yourself pattern and paired it with the Beehive Buzz Collection by Kathy Engle to create 3 cool containers. *I was harvesting my pumpkin patch and I think there may have been a garden stowaway.

From our partner By Annie -I received the Contain Yourself basket pattern and this generous kit with everything needed to create 3 baskets: Annie's own's Soft and Stable stabilizer, Fusible Interfacing, and Vinyl (for label pockets). And Island Batik sent 3 sets of beautiful Beehive Buzz fabrics. I added interest by choosing some pairs with strong contrast and others without.


 3 Containers - small 2" x 4", medium 6" x 6", large 11" x 11"
Sandra Starley 2022

Fabrics by Island Batik: (Beehive Buzz Collection)
Piecing Thread: Aurifil #50 weight
Quilting Thread: Aurifil #50 weight
                                        Pieced and quilted by Sandra Starley  (I quilted the medium and large main fabrics to add stability - optional step).

***Fabrics provided by Island Batik, pattern - stabilizers and vinyl
 from By Annie, thread by Aurifil, and needles by Schmetz. ***

I am pretty new to bag making - haven't made one in years but I found the ByAnnie pattern to be extremely user-friendly and easy to follow.  I made handles and sewed on vinyl, etc. - things outside the regular quilt skills. It is always good to work your brain and learn new things.

And to make things even easier, the pattern included a coupon for a fabulous BONUS; an "Add-On Video Tutorial". This is a series of videos that show you how to create the containers. Here's a pic of me following along with the video (top 1/2 of photo) with my fabric and pattern. 

Annie demos a section of the pattern on the video and then you do that step on your own box and then come back for the next step.  Annie shares lots of great tips to make the process doable for bag newbies like me.  For example: using an edge stitch foot for sewing the faux binding (final seam).

 And using lots of clips when sewing that seam and using your machine in free arm mode.

One more bonus - the pattern not only includes instructions for 3 different sized/shaped containers but directions on making your own custom sized soft sided bins. What a cool pattern! Thanks Annie!

To see more awesome bags and containers from By Annie, visit my fellow 2022 Island Batik Brand Ambassadors for the It's in the Bag Challenge:


Brenda Alburl ~ Songbird Designs
Megan Best ~ Bestquilter
Pamela Boatright ~ Pamelaquilts
Elizabeth DeCroos ~ Epida Studio
Jennifer Fulton ~ Inquiring Quilter

Preeti Harris ~ Sew Preeti Quilts
Mania Hatziioannidi ~ Mania for quilts
Jane Hauprich ~ Stitch By Stitch Custom Quilting
Reed Johnson ~ Blue Bear Quilts
Connie Kauffman ~ Kauffman Designs

Emily Leachman ~ The Darling Dogwood
Denise Looney ~ For The Love Of Geese
Leah Malasky ~ Quilted Delights
Maryellen McAuliffe ~ Mary Mack Made Mine
Anorina Morris – sameliasmum.com

Lisa Pickering ~ Lisa’s Quilting Passion
Claudia Porter ~ Create with Claudia
Gail Renna ~ Quilt Haven Threads
Brianna Roberts ~ Sew Cute And Quirky
Michelle Roberts ~ Creative Blonde

Gail Sheppard ~ Quilting Gail
Andi Stanfield ~ True Blue Quilts
Jennifer Thomas ~ Curlicue Creations
Suzy Webster ~ Websterquilt


Friday, September 9, 2022

Woodcut Blossoms Blog Hop - Free Patterns

Welcome to my stop on the Woodcut Blossoms Blog Hop introducing the new Island Batik collection designed by Kathy Engle for Heidi Pridemore of Whimsical Workshop. Don't forget to scroll down to the end of this post for links to visit the other 13 stops and get the patterns on the blog hop.


 I love Heidi's collection of rich florals and dots. I received precuts of the collection earlier this year as an Island Batik Ambassador so I was well acquainted with their beauty when Heidi asked for people to help her share them with the world. I was able to use 16 fabrics from the 20 in the group for my block.

***If you are looking for my new Island Batik Black and Yellow Star Studio 180 Design Quilt and Giveaway and Tool Talk Blog Hop - here's the link for it. ***

I really like to recreate pieces of the past and am often inspired by antique quilts in my collection when working on challenges and new patterns. Churn Dash or Shoofly or Monkeywrench is an awesome traditional pattern. I doubled the pattern or added a Dash center for a more modern block. 


Step by Step Pattern for the 12 inch finished (12 1/2" unfinished) Double Dash block using simple pieces and easy half-square triangles.

         CUTTING 
Part I - Churn Dash A - 6 1/2" (6" finished)

#1 - Center square -cut 1 dark - 2 1/2" square

#2  Side strips background dot and - dark floral 
 Cut 
4 light rectangles - 1 1/2" x 2 1/2" 
4 dark rectangles - 1 1/2" x 2 1/2"
 

#3 Half Square Triangle Corners - dot and dark floral
Cut 2 sets -used for 4 corners -diagonal seam 1/2 square triangles - see below
   2 light squares
 - 3"  
   2 dark squares - 3"  
**after sewing trim down to 2 1/2" squares 

-------------------
Part II -  Churn Dash B - 12 1/2" (12" finished)

(Center is completed Churn Dash A) 

#1 Side strips background dots/florals and - dark floral 
 Cut
4 light rectangles - 2" x 6 1/2" 
4 dark rectangles - 2" x 6 1/2"

#2 Half Square Triangle Corners - lt. dot/floral and dark floral
Cut 2 sets  -
used for 4 corners -diagonal seam 1/2 square triangles
2 light squares - 4"  
2 dark squares - 4"
**after sewing trim down to 3 1/2" squares

        PIECING 
#1 - Diagonal seams - Half square triangles using 2 sets of light and dark squares (background and florals fabrics) for corners of each Churn Dash sections. You'll make 2 different sets - small for Churn A and larger for Churn B.

Place a background and floral 3" square right sides together and draw a diagonal line from corner to corner on back of light fabric. Then draw a sewing line 1/4" on both sides of the diagonal. 
You will sew on these lines. Cut on the middle line and press block to the dark. Make 2nd pair of half squares. This makes 4 half square triangles. **Trim Churn A units to 2 1/2". 

Repeat process with 4" squares for Churn Dash B corners and make another 4 half square triangles. **Trim these to 3 1/2".

#2  Rectangle Strip units -
Sew a  light and dark rectangle (1 1/2" x 2 1/2")  together, press to dark, repeat to make 4 units for Churn A.

Sew a  light and dark rectangle (2" x 6 1/2")  together, press to dark, repeat to make 4 units for Churn B.

#3 - Block Construction  **for nesting seams and no dark fabric shadows, I pieced in horizontal rows and pressed to the dark fabrics and toward the rectangle strip sets.

Churn A - 
Row 1 and 3 - join 2 smaller 1/2 square triangles to a smaller rectangle strip,
Row 2 - join 2 rectangle strips to center square  
Add rows 1 and 3 to top/bottom of center row.
Churn A block should measure 6 1/2" 

Churn B
Row 1 and 3 - join 2 larger 1/2 square triangles to a larger rectangle strip,
Row 2 - join 2 rectangle strips to sides of Churn A
Add rows 1 and 3 to top/bottom of center row.
Double Churn Block should measure 12 1/2"

Voila!!  And here are 4 more ways to arrange the same set of pieces for different Double Dash blocks. You could make a fun little quilt using your 4 favorite Double Dash Blocks.

Follow me on social media @Textile Time Travels

For more patterns, visit my Etsy Shop, Textile Time Travels


Textile Time Travels on Instagram and 
Textile Time Travels on Facebook


WOODCUT BLOSSOMS BLOG HOP

To see all the other beautiful (and free) patterns created by my talented friends, visit their blogs (links below:

Heidi Pridemore (this is her amazing fabric collection!) Heidi's blog
Leanne Parsons Devoted Quilter
Tiffany Hayes  Needle In A Hayes Stack
Tammy Silvers Tamarinis
Kris Driessen Scrap Dash
Laureen M Smith Tourmaline Thyme Quilts
Rebecca Lidstrom StudiorQuilts
Laura L. Strickland Orange Blossom Quilt
Lissa LaGreca Lovingly Lissa
Katie Mae Quilts  KatieMaeQuilts
Laura Piland Slice of Pi Quilts

Thursday, July 21, 2022

Christmas in July- Island Batik and Accuquilt Challenge

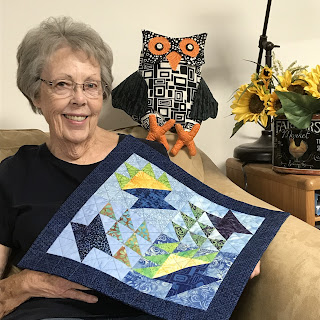
The July Island Batik Brand Ambassador challenge is "Christmas in July" and is sponsored by Accuquilt. We were to use the new Tree of Life cutting die to make a project and share the Christmas spirit and spread JOY by giving it to someone. Here's my completed quilt hanging in my Mom's sewing room.


And here's my Mom, Georgia with her new quilt and being supervised by Oliver (Ollie Owl pattern from Funky Friends Factory -April 2022 IB Challenge). She's given me so much that it was fun to give her a special quilt.

Mom loves sunflowers so I was happy to find this beautiful sunflower batik  in my IB stash builder strips - 5" by 42" wof - double the width of jelly roll strips and a great size for piecing. And even better, I found a second lighter yellow sunflower strip for the opposite basket!


Did I mention she loves sunflowers? It was easy to find sunflowers to stage the quilt. Here are two of my myriad choices.

Here's the Accuquilt Tree of Life die and a bit of my cutting. Clearly, lots of triangles will be involved in creating this quilt. This is a BOB die - Block on Board meaning that you can cut out all the pieces needed for a block with just one pass of the die through your Accuquilt Go! machine! NO pesky Y seams and the notched corners (no dog ears) make piecing easy.


So many options with this interesting new die. Would I be making the Tree like shown on the die above or little trees like below?  Or Bowties or Baskets? OR??? Ps. sneak peek at the alpaca and wool pressing mat from our new IB Ambassador sponsor Prairie Spirit Alpacas from Canada.


I decided to make several different baskets. And then had to figure how to arrange them - it was surprising how many different ways 4 blocks could be combined. This was my first choice:


After several tries, here's my final arrangement and the completed quilt. I machine quilted in horizontal, vertical, and diagonal lines creating an X in each of the 100 little squares (1.75") for 400 quilted triangles. That seemed appropriate given all the triangles in the Tree of Life pattern. I used a facing technique (sewing strips to front and turning them and seam allowance to the back) for a seamless edge finish. 


Baskets of Love and Sunflowers for Mom
17" x  17"
Original Design
Sandra Starley
July 2022

Fabrics: Woodcut Blossoms and various other Island Batik fabrics 
Piecing Thread: Aurifil #50 weight
Quilting Thread: Aurifil #50 weight
75/11 Chrome Needle: Schmetz Quilting Needles 
Tree of Life BOB die: Accuquilt
Pieced and quilted by Sandra Starley 

***Fabrics provided by Island Batik, batting by Hobbs, thread by Aurifil, needles by Schmetz, die by Accuquilt, and pressing mat by Prairie Spirit Alpacas. ***

To see more amazing Triangle Quilts, visit my fellow 2022 Island Batik Brand Ambassadors:

Brenda Alburl ~ Songbird Designs
Megan Best ~ Bestquilter
Pamela Boatright ~ Pamelaquilts
Elizabeth DeCroos ~ Epida Studio
Jennifer Fulton ~ Inquiring Quilter

Preeti Harris ~ Sew Preeti Quilts
Mania Hatziioannidi ~ Mania for quilts
Jane Hauprich ~ Stitch By Stitch Custom Quilting
Reed Johnson ~ Blue Bear Quilts
Connie Kauffman ~ Kauffman Designs

Emily Leachman ~ The Darling Dogwood
Denise Looney ~ For The Love Of Geese
Leah Malasky ~ Quilted Delights
Maryellen McAuliffe ~ Mary Mack Made Mine
Anorina Morris – sameliasmum.com

Lisa Pickering ~ Lisa’s Quilting Passion
Claudia Porter ~ Create with Claudia
Gail Renna ~ Quilt Haven Threads
Brianna Roberts ~ Sew Cute And Quirky
Michelle Roberts ~ Creative Blonde

Gail Sheppard ~ Quilting Gail
Andi Stanfield ~ True Blue Quilts
Jennifer Thomas ~ Curlicue Creations
Suzy Webster ~ Websterquilt


Related Posts Plugin for WordPress, Blogger...