Monday, May 8, 2023

Island Batik Studio 180 Design - Tool Craze Blog Hop - Maple Island Table Runner


 This month's Island Batik Ambassador Challenge is sponsored by Deb Tucker and Studio 180 Design. Each of us is working on a "Tool Craze" project using a new Island Batik Collection and a ruler tool from Studio 180 Design. 


The brief was to use the assigned new collection: Maple Island (a beautiful grouping of pinecones and maple leaves and aspen trees)

and the Studio 180 Design ruler. I received the  Four Patch Square Up Ruler which makes 4 patch blocks  in 12 different sizes from 1/2" finished to 6" finished. I needed to make at least 30 units and at least 2 different sized blocks. 


I ended up making 60 units and 6 different blocks in 4 sizes.
    1" finished (4 Patch and Offset)
    2" finished (4 Patch and Offset)
    3" finished (4 Patch)
    4" finished (4 Patch)
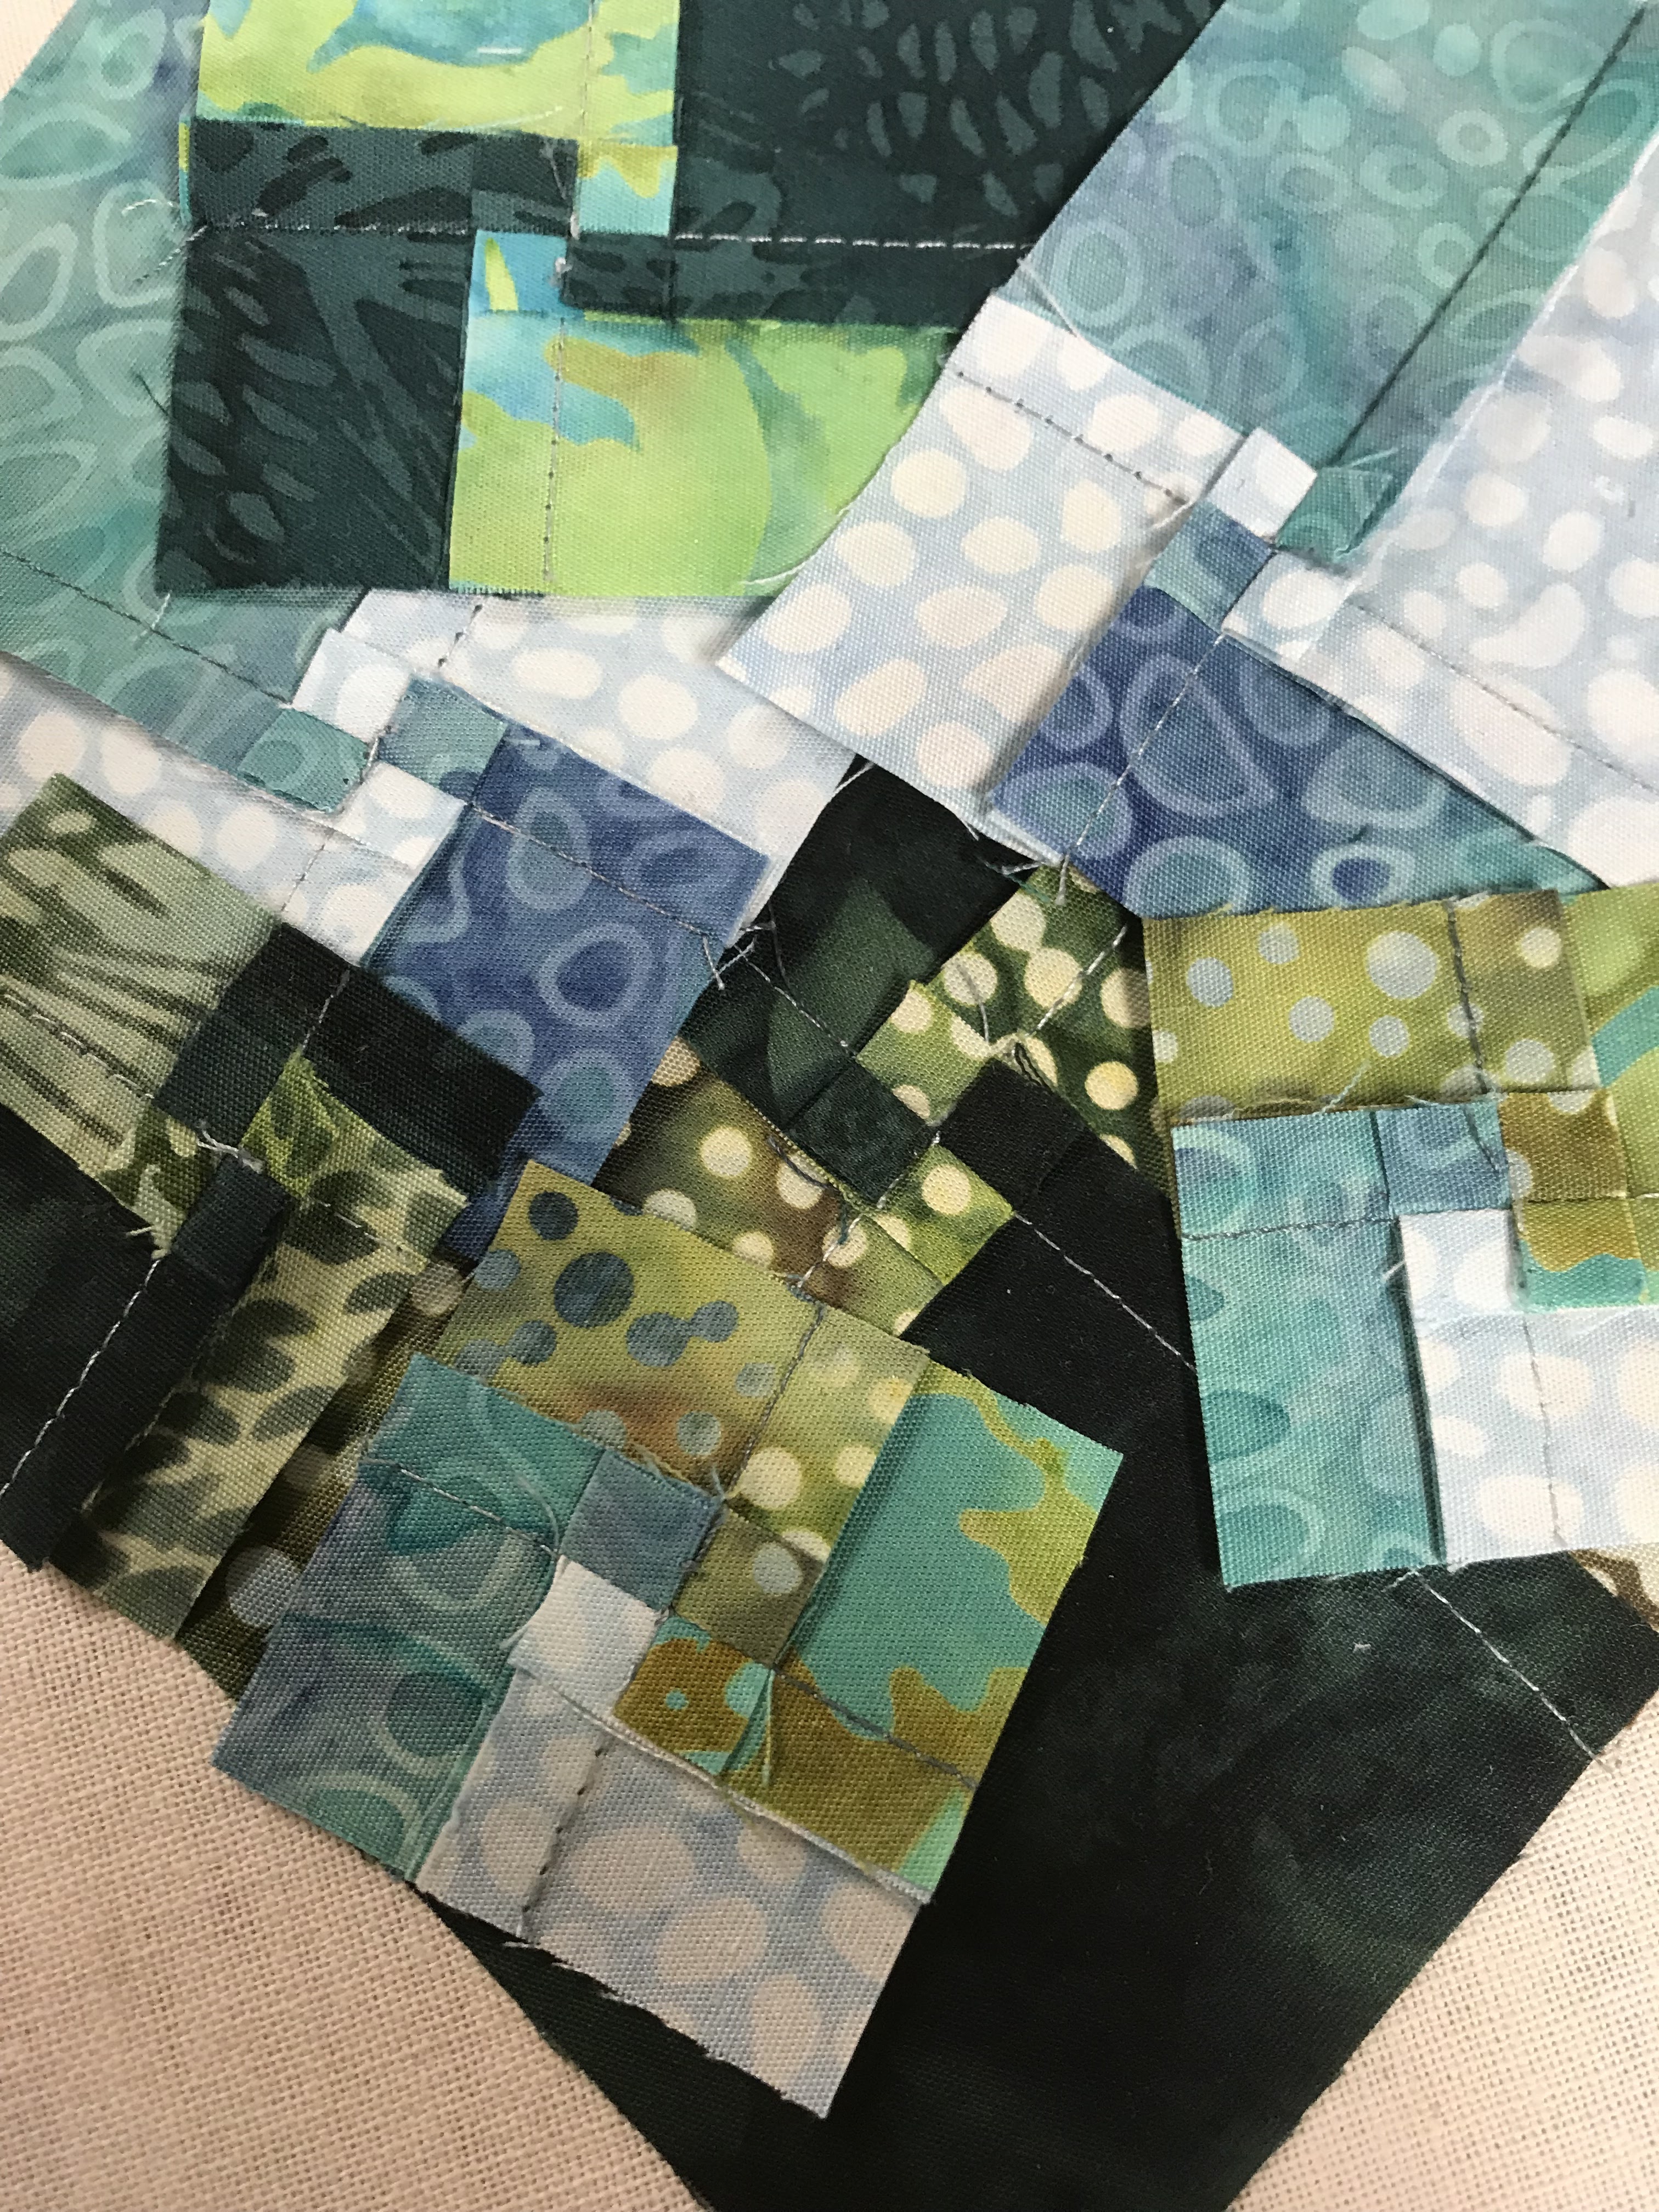
Look at those teeny 4 Patches on the back - a key to the tool's precision is to spin and press the seams or intersections.

*I used the extra Technique Sheet for Offset Four Patch using the same tool. The Offset or uneven blocks add extra interest and pizzazz to the regular Four Patches. I made regular and offset Four Patches that finished at just ONE inch!!! See those little 4 patches in regular and the double 4 Patches (offset). 

I was really impressed with the accuracy I achieved using the Four Patch Square Up tool even working with those tiny pieces.

Walking Through the Woods
16" x 28"
Original Design
Sandra Starley May 2023

 Batiks: Maple Island Collection - every fabric (20 pieces)
Backing: Pincecone (Foundation Basics)
Piecing Thread: Aurifil #50 weight
Quilting Thread: Aurifil #50 weight
Four Patch Square Up  Ruler: Studio 180 Design

***Fabrics provided by Island Batik, batting by Hobbs, Four Patch Square Up  Ruler/Tool by Studio 180 Design,  thread by Aurifil, and needles by Schmetz


GIVEAWAY
I have lots of little pieces cut from my experimenting with the tool and design process, Leave a comment for a chance to win. USA addresses only. Please make sure I can reach you if you win. I'll do a random drawing at the end of the blog hop - end of May. And visit Island Batik's blog for their weekly giveaway.

 To see more of the new Island Batik Collections and what my fellow ambassadors are making with them and the Studio 180 Design Rulers/Tools AND to have chances to win new Island Batik fabrics, follow along with this month's Blog Hop. Some of the other ambassadors are doing giveaways too (links below).

WEEK 1

    May 1

Celebrate
Celebrate

Susan Deshensky, Lady Blue Quilts
Randi Jones, Randi’s Roost

    May 2

holiday-at-home
holiday-at-home


Elita Sharpe, Busy Needle Quilting
Mania Hatziioannidi, Mania for Quilts

    May 3

Let it Snow
Let it Snow

 Brittany Fisher, Bobbin with Brittany
Pamela Boatright, Pamela Quilts

    May 4

Make a Wish
Make a Wish


Denise Looney, For the Love of Geese
Connie Kauffman, Kauffman Designs

    May 5

Blog Hop Round-Up Week 1 and Giveaway

WEEK 2

    May 8

maple island
Maple Island

Reed Johnson, Blue Bear Quilts   

Sandra Starley, Textile Time Travels -  you are here - leave a comment for the Giveaway!

        May 9

Sandalwood
Sandalwood

Gail Sheppard, Quilting Gail
Lana Russel, Lana Quilts

    May 10

Sea Cookies
Sea Cookies

 Emily Leachman, The Darling Dogwood
Claudia Porter, Create with Claudia
Anorina Morris, Samelia’s Mum

    May 11

Sorbet
Sorbet

 Brenda Alburl, Songbird Designs
Jennifer Thomas, Curlicue Creations

May 12

Blog Hop Round-Up Week 2 and Giveaway

WEEK 3

May 15

Summer Twilight
Summer Twilight


Victoria Johnson, Forever Quilting for You
Maryellen McAuliffe, Mary Mack Made Mine
Leah Malasky, Quilted Delights
Lisa Pickering, Lisa’s Quilting Passion

May 16

Sunny Meadow
Sunny Meadow


Sarah Pitcher, Pitcher’s Boutique
Renee Atkinson, Pink Tulip Quilting

May 17

Wild Blooms
Wild Blooms

Preeti Harris, Sew Preeti Quilts
Suzy Webster, Websterquilt
Lisa Pickering, Lisa’s Quilting Passion

May 18
End of Blog Hop + Final Round Up

Monday, May 1, 2023

Crazy Quilt Challenge - April Island Batik Ambassador Project with Aurifil Thread


April's challenge for the Island Batik Ambassadors was to create a Crazy Quilt inspired project showcasing one of the Aurifil 2022 Color Builders set.  More about the thread in a minute. The project could be any type or size, it just needed to feature crazy quilting. The fabrics could be any from our Winter box. I picked two of the Island Batik color Gradations - a strip pack of Playful Purples (2.5") and a stack of Bodacious Blacks (10"). Interestingly, the Black collection has more light fabrics than the purple. I decided it would be fun to make a crazy quilt pillow!


Back to the Aurifil threads - the mini collections we were using are based on Rainforest plants and each feature 2 variegated threads and a complementary solid in 50 weight thread. I received the Golden Shrimp Plant Collection with a really fun multi-colored variegated thread, a yellow variegated (subtly) and a cheery yellow/orange. Perfect colors to contrast with purple! I had a lot of fun joining fabrics randomly to create folky funky stars.


I used lots of crazy quilt stitching with the Aurifil thread to embellish the crazy pieced star blocks. This is how the blocks looked BEFORE the machine quilting/embroidery (and a bit of hand quilting).


And here they are AFTER


And the finished pillow

Crazy Stars! Pillow
14" x 14"
April 2023
Sandra Starley
Freeform, crazy piecing
Machine Quilting - hand quilting
Original Design

Fabrics: Island Batik Playful Purple and Bodacious Blacks

Piecing Thread: Aurifil #50 weight
Quilting/embroidery Thread Aurifil #50 weight: Golden Shrimp Plant Collection

75/11 Chrome Microtex Needle: Schmetz Quilting Needles 
Pieced and quilted by Sandra Starley 

***Fabrics provided by Island Batik, batting by Hobbs, thread by Aurifil, needles by Schmetz  ***


 For more inspiration and delight, see all the amazing crazy quilt projects, my fellow Island Batik Ambassadors made in April. 


Brenda Alburl ~ Songbird Designs
Renee Atkinson ~ Pink Tulip Quilting
Pamela Boatright ~ PamelaQuilts
Susan Deshensky ~ Lady Blue Quilts
Brittany Fisher ~ Bobbin with Brittany

Preeti Harris ~ Sew Preeti Quilts
Mania Hatziioannidi ~ Mania for quilts
Reed Johnson ~ Blue Bear Quilts
Victoria Johnson ~ Forever Quilting for You
Randi Jones ~ Randi’s Roost

Connie Kauffman ~ Kauffman Designs
Emily Leachman ~ The Darling Dogwood
Denise Looney ~ Quiltery – For The Love Of Geese
Leah Malasky ~ Quilted Delights
Maryellen McAuliffe ~ Mary Mack Made Mine

Anorina Morris ~ sameliasmum.com
Lisa Pickering ~ Lisa’s Quilting Passion
Sarah Pitcher ~ Pitcher’s Boutique
Claudia Porter ~ Create with Claudia
Lana Russel ~ Lana Quilts

Elita Sharpe ~ Busy Needle
Gail Sheppard ~ Quilting Gail
Sandra Starley ~ Textile Time Travels
Jennifer Thomas ~ Curlicue Creations
Suzy Webster ~ Websterquilt


Friday, March 31, 2023

March 2023 Island Batik "It's All Up To You" Challenge - Rocky Road

 This month's Island Batik Challenge: "It's All Up To You" meaning everything about the new project was up to ME! The pattern, the size, which fabric, etc., it was totally open. SEW many choices and options. I decided to use the awesome new collection Royal Crown to remake an antique quilt made by my Great Grandma.

Here's the antique inspiration Rocky Road to Kanosh and the new remake Rocky Road


Rocky Road
22" x 22"
Sandra Starley
March 2023
Foundation Paper Piecing - 6" blocks
Original Design, Antique Inspired

Fabrics: Royal Crown Collection - every fabric (20 pieces)
Backing and border: Dandelion Jelly  (Blenders)
Piecing Thread: Aurifil #50 weight
Quilting Thread: Aurifil #50 weight
75/11 Chrome Microtex Needle: Schmetz Quilting Needles 
Pieced and quilted by Sandra Starley 

***Fabrics provided by Island Batik, batting by Hobbs, thread by Aurifil, needles by Schmetz  ***

I used the Royal Crown Strip Pack/ 2 1/2" strips to make my Rocky Road blocks using foundation paper piecing.  Look at all the yummy colors and patterns.


Some of the stores carrying Royal Crown
A & A Sewing (LA)
Bird in Hand (PA)
Boutique for Quilters (FL)
Creations Quilt Shop (MN)
Creekside Quilts (OR)
Equilter.com (CO)
Hancocks of Paducah (KY)
Quilters Dream (TX)
Quilteroos (LA)
Sew This (LA)
Stitchin Heaven (TX)
Whimsical Workshop (AZ)
Castle Sewing Centre- CANADA BC
JellyRollFabric.Net (IN)S

This is what the blocks looked like before I added the purples to create background and a frame. 

The beautiful purples of Royal Crown

Close- up

More of the Rocky Road to Kanosh made in the 1930s by my Great Grandma Isabelle Rogers.

Why not challenge yourself to create a new quilt for April!
 For inspiration see all the amazing quilts, my fellow Island Batik Ambassadors made in March. 


Brenda Alburl ~ Songbird Designs
Renee Atkinson ~ Pink Tulip Quilting
Pamela Boatright ~ PamelaQuilts
Susan Deshensky ~ Lady Blue Quilts
Brittany Fisher ~ Bobbin with Brittany

Preeti Harris ~ Sew Preeti Quilts
Mania Hatziioannidi ~ Mania for quilts
Reed Johnson ~ Blue Bear Quilts
Victoria Johnson ~ Forever Quilting for You
Randi Jones ~ Randi’s Roost

Connie Kauffman ~ Kauffman Designs
Emily Leachman ~ The Darling Dogwood
Denise Looney ~ Quiltery – For The Love Of Geese
Leah Malasky ~ Quilted Delights
Maryellen McAuliffe ~ Mary Mack Made Mine

Anorina Morris ~ sameliasmum.com
Lisa Pickering ~ Lisa’s Quilting Passion
Sarah Pitcher ~ Pitcher’s Boutique
Claudia Porter ~ Create with Claudia
Lana Russel ~ Lana Quilts

Elita Sharpe ~ Busy Needle
Gail Sheppard ~ Quilting Gail
Sandra Starley ~ Textile Time Travels
Jennifer Thomas ~ Curlicue Creations
Suzy Webster ~ Websterquilt


Tuesday, February 14, 2023

Island Batik All Puffed Up Puff Quilt Blog Hop

This month's challenge for Island Batik Ambassadors is making a puff or biscuit or pillow (poofy) quilt. I've never made one before and it was an interesting challenge. More about that in a minute.


Rainbow Trip Around the Garden
55" x  55"
Traditional and Original Design
Sandra Starley
February 2023

Fabrics: Garden Delight Collection - every fabric (20 pieces)
Backing: Island Batik Linen  (Naturally Neutrals)
Batting: Hobbs Poly-Down Batting and 
Piecing Thread: Aurifil #50 weight
Quilting Thread: Aurifil #50 weight
80/12 Microtex Needle: Schmetz Quilting Needles 
Pieced and quilted by Sandra Starley 

***Fabrics provided by Island Batik, batting by Hobbs, thread by Aurifil, needles by Schmetz, Strip cutter and Go Cutting Machine by Accuquilt,  

Ollie the Owl enjoying the cozy puff quilt on a snowy morning.

A bit of the design process. I played a bit with the colors and decided the technique and fabrics were perfect for a traditional Trip Around the World. I do love using antique patterns.

I viewed a LOT of videos and tutorials on how to make a puff quilt but did not want to do the method shown most with lots of pieces and tedious sewing. Cutting over a 100 top pieces and 100 plus backing pieces and 300 batting pieces?? No!

And I didn't want to try to tie or quilt a super poofy quilt. 

I found an easier version that did not require making individual puffs or cutting squares of backing and sewing them together. YAY!!! 

I simply cut all the 5 1/2" strips and then squares using my Accuquilt cutter and sewed them together in the regular way. Next I placed the completed top on the backing (without batting).  I then sewed one horizontal line (between rows 5/6) all the way across the top. 

Next step is sewing all the long/vertical seams creating half channels. This means I only needed to reach inside 1/2 of the quilt for stuffing. These were then stuffed with Poly-down polyester barting from Hobbs. I worked in rows - starting with the rows created by my horizontal seam (row 5 and 6). Once they were stuffed, I closed them with another horizontal seam. I kept repeating until all the rows/squares were puffed! 

I loved that I did not need to make each little puff unit. But could I make the process even easier? Yes, I found a trick of creating 3 layers of  batting by strip cutting the batting and folding them into thirds to stuff each puff. So instead of cutting 363 squares, I only cut 121 strips. *I cut the batting in 4 1/2" strips across the width and then subcut to 13 1/2" strips. This meant I got three layers of puffing with a single strip of batting. It does take a lot of batting and I used almost an entire queen sized batting to create this quilt! Thanks again Hobbs Batting!

I used a facing/knife edge binding technique to finish the edges. Always good to experiment and try new things!

Things I learned - 1) puff quilts are kind of fun, 2) don't make your squares any smaller than 5 1/2 cut/ 5" finished or you won't be able to get your arm inside the stuffing channels, 3) a walking foot is a must have for sewing/quilting your puffy rows, and 4) remember to experiment and have FUN!!

Visit the Island Batik Blog each week this month for great giveaways and check out all the other Island Batik Ambassadors and their Puff Quilts.

****The following shops have the Garden Delight Collection now!!! ***
Creekside Quilts OREE Schenck Co ORHancocks of Paducah KYSwifty Stitches CA


Monday, February 13, 2023

Chickadee Churn Dash - Chickadee Blog Hop


 Hi - Look at this fun block with fabulous fabrics.


Welcome to my stop on the Chickadee Blog Hop introducing the new Island Batik collection designed by Kathy Engle for Heidi Pridemore of Whimsical Workshop. Don't forget to scroll down to the end of this post for links to visit the other stops and get the patterns on the blog hop.


 I love Heidi's collection of fun chicken patterns and patchwork hearts. Plus great dots and other cheery textures including chicken wire.  I was able to use each of the 20 fabrics from the the group for my block.

I really like to recreate pieces of the past and am often inspired by antique quilts in my collection when working on challenges and new patterns. Churn Dash or Shoofly or Monkeywrench is an awesome traditional pattern. I doubled the pattern or added a Dash center for a more modern block. 

Step by Step Pattern for the 12 inch finished (12 1/2" unfinished) Double Dash block using simple pieces and easy half-square triangles.

         CUTTING 
Part I - Churn Dash A - 6 1/2" (6" finished)

#1 - Center square -cut 1 dark - 2 1/2" square

#2  Side strips background dot and - dark floral 
 Cut 
4 light rectangles - 1 1/2" x 2 1/2" 
4 dark rectangles - 1 1/2" x 2 1/2"
 

#3 Half Square Triangle Corners - dot and dark floral
Cut 2 sets -used for 4 corners -diagonal seam 1/2 square triangles - see below
   2 light squares
 - 3"  
   2 dark squares - 3"  
**after sewing trim down to 2 1/2" squares 

Part II -  Churn Dash B - 12 1/2" (12" finished)

(Center is completed Churn Dash A) 

#1 Side strips background dots/florals and - dark floral 
 Cut
4 light rectangles - 2" x 6 1/2" 
4 dark rectangles - 2" x 6 1/2"

#2 Half Square Triangle Corners - lt. dot/floral and dark floral
Cut 2 sets  -
used for 4 corners -diagonal seam 1/2 square triangles
2 light squares - 4"  
2 dark squares - 4"
**after sewing trim down to 3 1/2" squares

        PIECING 
#1 - Diagonal seams - Half square triangles using 2 sets of light and dark squares (background and florals fabrics) for corners of each Churn Dash sections. You'll make 2 different sets - small for Churn A and larger for Churn B.

Place a background and floral 3" square right sides together and draw a diagonal line from corner to corner on back of light fabric. Then draw a sewing line 1/4" on both sides of the diagonal. 
You will sew on these lines. Cut on the middle line and press block to the dark. Make 2nd pair of half squares. This makes 4 half square triangles. **Trim Churn A units to 2 1/2". 

Repeat process with 4" squares for Churn Dash B corners and make another 4 half square triangles. **Trim these to 3 1/2".

#2  Rectangle Strip units -
Sew a  light and dark rectangle (1 1/2" x 2 1/2")  together, press to dark, repeat to make 4 units for Churn A.

Sew a  light and dark rectangle (2" x 6 1/2")  together, press to dark, repeat to make 4 units for Churn B.

#3 - Block Construction  **for nesting seams and no dark fabric shadows, I pieced in horizontal rows and pressed to the dark fabrics and toward the rectangle strip sets.

Churn A - 
Row 1 and 3 - join 2 smaller 1/2 square triangles to a smaller rectangle strip,
Row 2 - join 2 rectangle strips to center square  
Add rows 1 and 3 to top/bottom of center row.
Churn A block should measure 6 1/2" 

Churn B
Row 1 and 3 - join 2 larger 1/2 square triangles to a larger rectangle strip,
Row 2 - join 2 rectangle strips to sides of Churn A
Add rows 1 and 3 to top/bottom of center row.
Double Churn Block should measure 12 1/2"

Voila!! 

Here are the links to see more wonderful projects featuring the Chickadee Collection:

Heidi Pridemore (this is her amazing fabric collection!) Heidi's blog
Leanne Parsons Devoted Quilter
Tammy Silvers Tamarinis
Nancy Scott MasterpieceQuilting
Katie Mae Quilts  KatieMaeQuilts
Rebecca Lidstrom StudiorQuilts
Tiffany Hayes  Needle In A Hayes Stack
Laura Piland Slice of Pi Quilts

Kris Driessen Scrap Dash


Related Posts Plugin for WordPress, Blogger...